TDS02 - Training Digital Signal Processing 02
© Harry Broeders - Hogeschool Rotterdam.
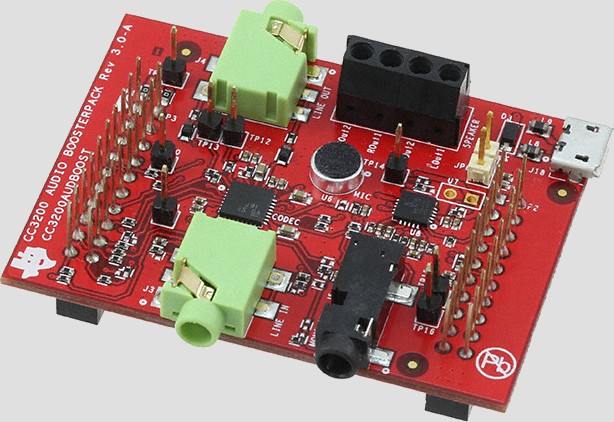
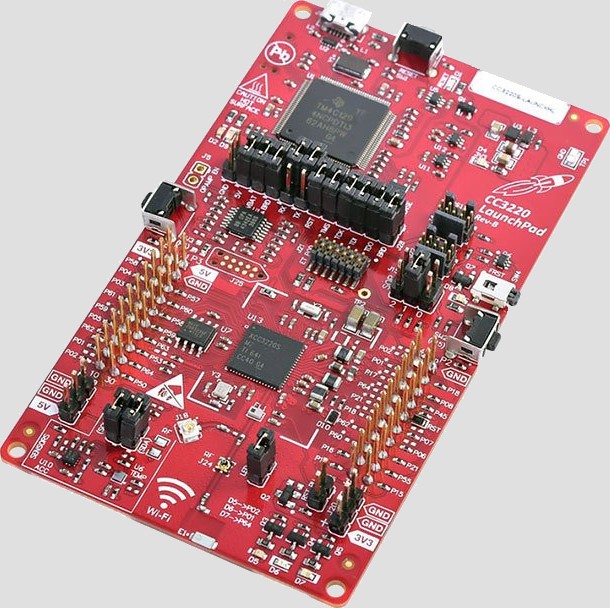 This page is meant for student of the minor Embedded
Systems at Rotterdam University or anyone who wants to experiment with digital
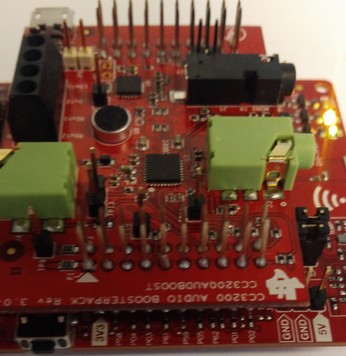
signal processing using the CC3200AUDBOOST Audio
BoosterPack from Texas Instruments (shown on the left) in combination with
their CC3220S LaunchPad
development board (shown on the right). This introduction describes how to
install the proper software to experiment with these boards. The two most
important components on these boards are the CC3220S SimpleLink™ Wi-Fi®
Wireless Microcontroller Unit and the TLV320AIC3254 Codec (coder-decoder). The
CC3220S System-on-Chip (SoC) is a single-chip with two separate execution
environments: an user application dedicated ARM® Cortex®-M4 MCU and a network
processor MCU. The TLV320AIC3254 is a 20-bit stereo audio codec with embedded
miniDSP which can operate with a sample rate of up to 192 ksps (kilo samples
per second) and is optimized for low-power operation. The audio quality is
higher than CD quality which uses 16-bits with a sample rate of 44.1 ksps.
This page is meant for student of the minor Embedded
Systems at Rotterdam University or anyone who wants to experiment with digital
signal processing using the CC3200AUDBOOST Audio
BoosterPack from Texas Instruments (shown on the left) in combination with
their CC3220S LaunchPad
development board (shown on the right). This introduction describes how to
install the proper software to experiment with these boards. The two most
important components on these boards are the CC3220S SimpleLink™ Wi-Fi®
Wireless Microcontroller Unit and the TLV320AIC3254 Codec (coder-decoder). The
CC3220S System-on-Chip (SoC) is a single-chip with two separate execution
environments: an user application dedicated ARM® Cortex®-M4 MCU and a network
processor MCU. The TLV320AIC3254 is a 20-bit stereo audio codec with embedded
miniDSP which can operate with a sample rate of up to 192 ksps (kilo samples
per second) and is optimized for low-power operation. The audio quality is
higher than CD quality which uses 16-bits with a sample rate of 44.1 ksps.
Obtain hard- and software
Students which follow the minor Embedded Systems at Rotterdam University may
buy the boards shown above at the shop at EAS. To prevent damaging the boards
by Electro Static Discharge (ESD) you have to observe the following precautions
while handling the board:
- Ground yourself, preferably by using a wrist-strap.
- Always use a shielded bag if you need to transport the boards.
There are four programs which we will use in combination with these
boards:
You can choose to work on your own laptop or on a PC avaiable in the lab.
- If you work on your own PC, you have to install the software as explained
in the following two paragraphs.
- If you work on a PC in the lab, you can find all programs in the Liquit
Workspace. As an example, we explain here how you can use the program Tera
Term. Start Liquit Workspace and look for Tera
Term in the Catalog.
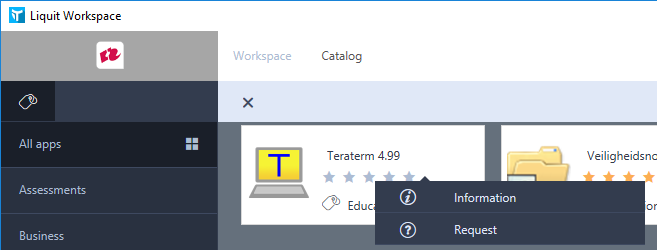
Click your right mouse button and click Request. The program will now be available in the
Liquit Workspace.
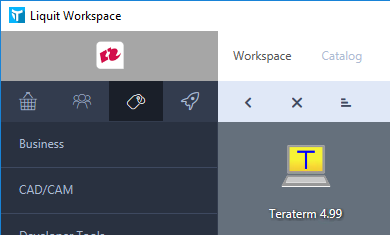
You can start the program by double clicking the icon. You now have to
start Code Composer Studio from Liquit so this program including all
drivers will be installed. You can skip the next three paragraphs and
continue here.
Install Tera Term, UniFlash and Soundcard Oscilloscope
Tera Term can be downloaded from https://osdn.net/projects/ttssh2/releases/.
UniFlash can be downloaded from http://www.ti.com/tool/download/UNIFLASH.
Soundcard Oscilloscope can be downloaded from zeitnitz.eu/scms/scope_en.
The installation of these programs needs no further explanation.
Install MATLAB
You can find the instructions to install MATLAB on your own PC in the
direcory \\artemis03\STUD02\Opleiding\Elektrotechniek\2019-2020\Minor
Embedded Systems\TDS02\Software on the students network of Rotterdam
University.
Install Code Composer Studio
CCS can be downloaded from http://processors.wiki.ti.com/index.php/Download_CCS.
After accepting the license and choosing the install directory, you need to
select the product families to install. You have to select SimpleLink™ Wi-Fi® CC32xx Wireless MCUs.
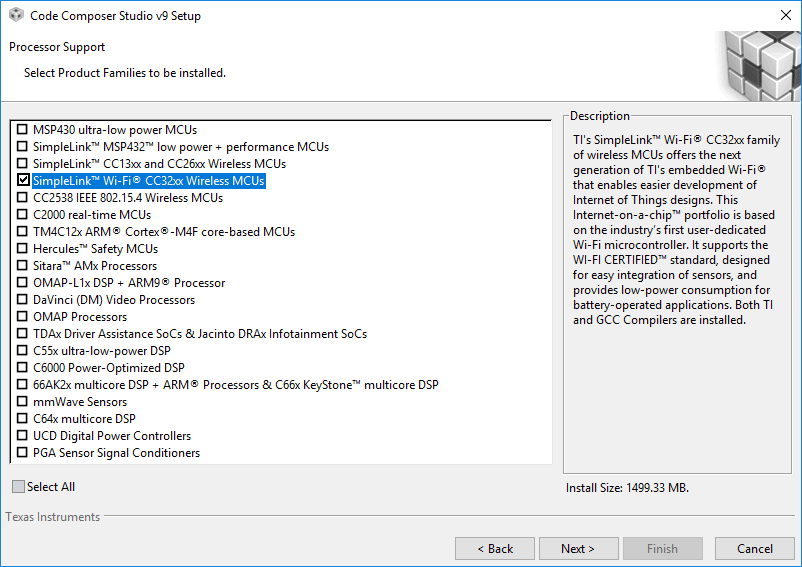
Press Next and then press Finish.
The installation of CCS9 needs no further explanation. This tutorial assumes
that CCS9 is installed in its default directory C:\ti\ccsv9.
Run the out of the box application on the CC3220S
LAUNCHXL board
The CC3220S LAUNCHXL board comes with an out of the box application
installed in its flash memory. We start by running this application. Connect
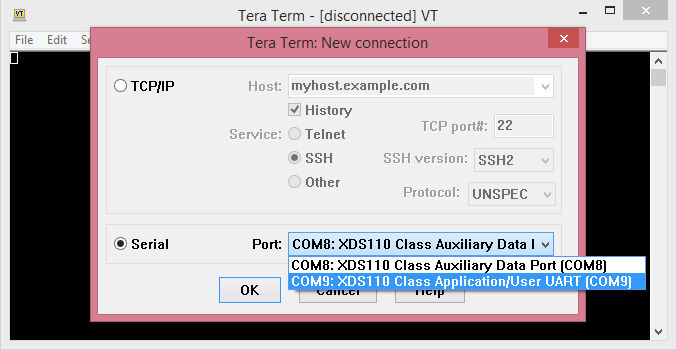
your board with the PC using an USB cable. Now start Tera Term.
Select Serial and select the XDS110 Class Application/User UART. This can be a
different (virtual) COM port as shown below.
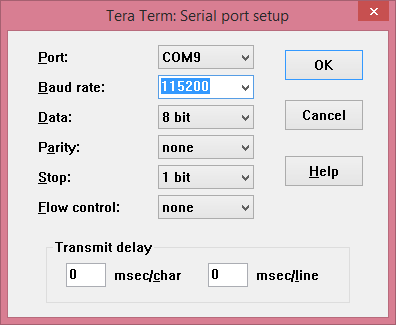
Choose Setup, Serial port... from the menu.
Adjust the Baud
rate as shown below.
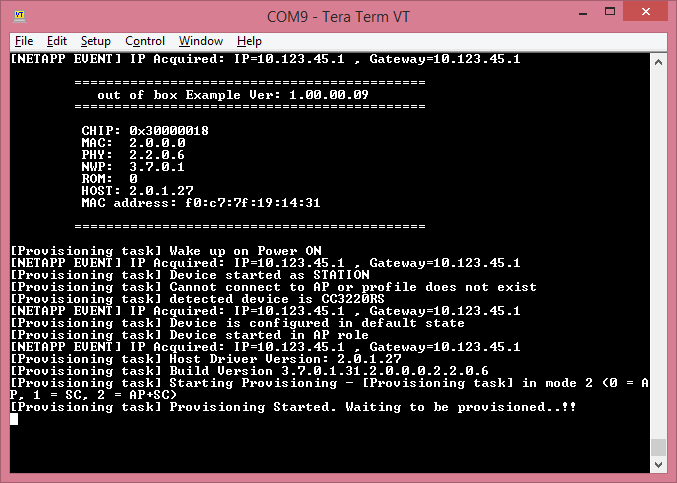
Now reset the CC3220S LAUNCHXL board by pressing the reset button which is
located next to the USB connector.
If all goes well, the output shown below, will be displayed in Tera Term.
 .
.
The out of the box application has started and some properties of the system
are reported (e.g. the MAC address). The board is now waiting to be
provisioned. In telecommunication, provisioning involves the process of
preparing a network node to allow it to provide services to its users. The
board supports two methods for provisioning AP + SC:
- Access Point (AP) - During AP provisioning, an unprovisioned Wi-Fi device
temporarily operates as an AP. This allows a device such as a smartphone or
tablet to connect to it over Wi-Fi and transmit the network information for
the desired network connection.
- SmartConfig (SC) - SmartConfig is a TI proprietary provisioning method
that uses a smartphone or tablet to broadcast network credentials to a TI
Wi-Fi device.
You can now use your smartphone to connect to connect to the access point
named mysimplelink-XXXXXX, where XXXXX are the last 6
(hexadecimal) digits from your MAC address. When your smartphone is connected
to this access point you can open the website which is embedded in the out of
the box application running on the CC3220S LAUNCHXL board. Just type the IP
address 10.123.45.1 into the address bar of your favorite browser.
You should be able to switch the red led on and off and to see the output of
the accelerometer.
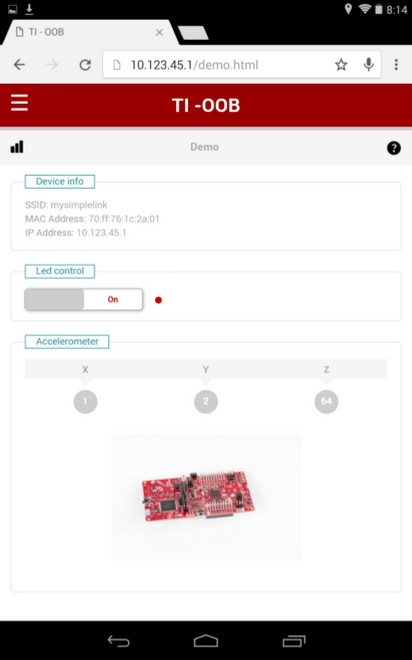
If you can see something similar to the figure above, you know that your
board is working properly. It is now time to remove the out of the box
application from the board's flash memory. Because otherwise we will have a lot
of Wi-Fi access points in the lab which will interfere with the school's Wi-Fi
network. You can always reinstall the out of the box application later.
Replace the out of the box application with a simple blinking led
application
The code for the blinking led application is contained in a zip file which
you can download here: images/knipper_groene_led_180512203400.zip.
Download this file to your PC.
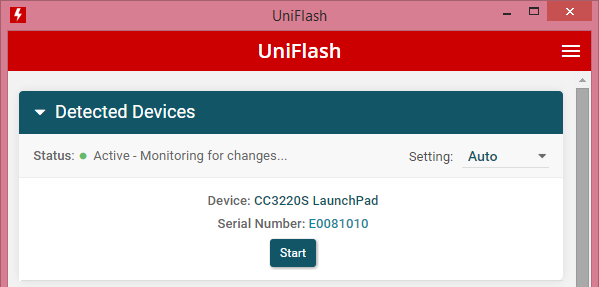
Open the UniFlash program and connect your CC3220S LAUNCHXL board to the PC.
If all goes well UniFlash will recognize your board and you can press Start.
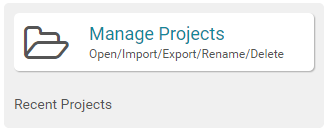
Now click on Manage Projects.
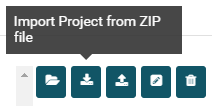
Click on the Import Project from ZIP file
icon and select the file knipper_groene_led_180512203400.zip that
you have downloaded earlier.
Select the project knipper_groene_led and click on the Open Selected Project icon.

Now click the Connect button.
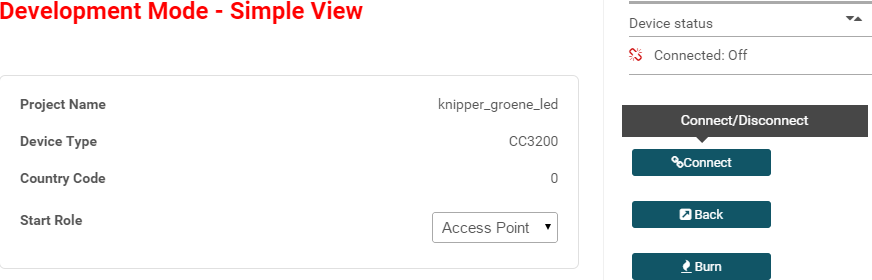
Click the Burn button.

Finally, click on the Connect, Create and Program
Image button.

The blinking led application is now programmed into the flash memory on
theCC3220S LAUNCHXL board. After programming this application will start and,
if all went well, the green led will blink. Now every time you reset the board
this blinking led application will run. No Wi-Fi access point will be created
by the board anymore.
Warnings!
- If you use Code Composer Studio (CCS) in the lab do not update the software! Because you don't
have the necessary access rights CCS will refuse to start after the
'update'.
- If you start CCS in the lab for the first time, a pop-up window
tells you that a Workspace will be created on the C-drive. It is more convenient to place your
Workspace on your H-drive.
Install the SimpleLink CC32XX SDK (Software Development Kit) using CCS.
Open Code Composer Studio and choose View, Resource Explorer. Scroll down to find
SimpleLink CC32XX SDK. Click on Download and install.
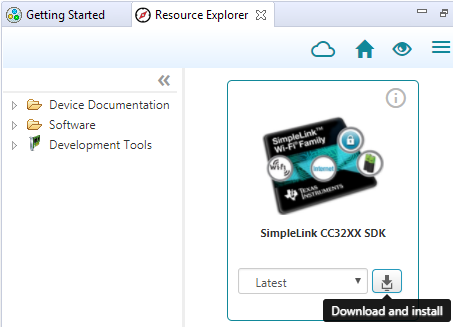
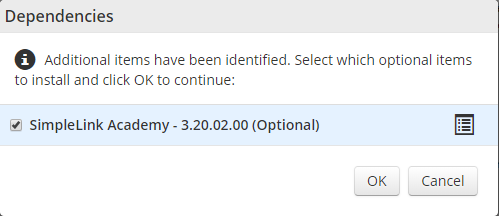
Check the SimpleLink Academy option.
Recompile the driverlib
To properly debug programs which use the driverlib (included in the
SimpleLink SDK), the driverlib must be recompiled.
Choose Project, Import CCS projects... from the menu.
Click the Browse button and select the directory where the
latest version of the simplelink_cc32xx_sdk has been installed:
C:\ti\simplelink_cc32xx_sdk_3_20_00_06\source\ti\devices\cc32xx.
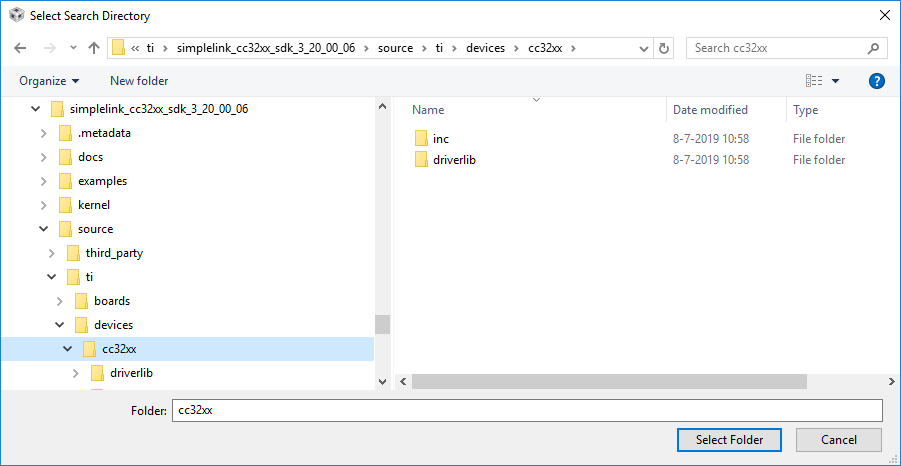
Click Select Folder.
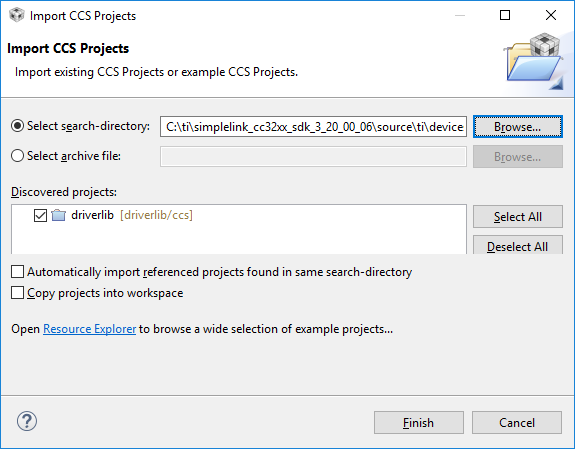
Click Finish.
Choose Project, Build Project from the menu.
Wait until the message **** Build Finished **** appears in the
Console window.
Connect the C3200AUDBOOST Audio BoosterPack with the CC3220S LAUNCHXL
board
Now it is time to mount the C3200AUDBOOST Audio BoosterPack on top of the
CC3220S LAUNCHXL board. The 2x10 pin Launchpad headers (P1, P2, P3, P4) connect
the CC3200AUDBOOST board to the CC3220S LAUNCHXL. The headers provide the
necessary interface to power up the audio boosterpack and access the
I2C and I2S lines on the CC3220S LAUNCHXL board. While
connecting to the CC3220S LAUNCHXL, ensure that the white 3V3 marker on the
CC3220S LAUNCHXL board matches with the white triangle on the CC3200AUDBOOST
boosterpack.
Run our demo program
The code and project files for the demo program are contained in a zip file
which you can download here: line_in_2_line_out/line_in_2_line_out.zip.
Download this file to your PC.
Start Code Composer Studio and choose a workspace directory. In this
tutorial the workspace directory C:\workspace_v9\CC3220S is used.
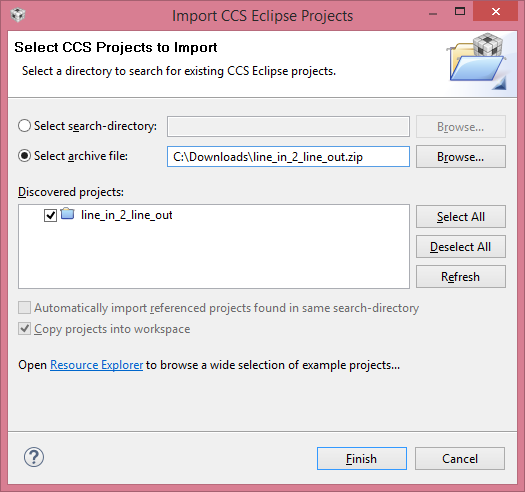
Choose Project, Import CCS Projects... from the menu.
Choose the Select archive file option and press Browse... Now select
the file line_in_2_line_out.zip which you downloaded earlier and
press Finish.
Now connect your board to the PC and press the debug button  . The debugger will stop the program
when the function
. The debugger will stop the program
when the function main is entered.
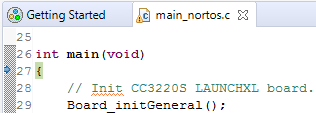
Press the resume button  .
.
The demo program will now copy the signals (left and right) on the line
input to the line output. You can use a signal generator and an oscilloscope to
test the program. The input signal should be about 1 Vpp. Take care
to connect the output signal of the signal generator to the line input of your
board. Connecting two outputs together can damage your board. Alternatively you
can use your smartphone and headset to test the program.
Inconvenience while debugging.
A problem occurs when a program which is using the CC3200AUDBOOST is paused, by
using the pause button  or by setting a breakpoint, and then continued again using the
resume button .
Because the codec on the CC3200AUDBOOST board keeps sending samples via the
I2S connection when the CC3220S processor is paused, the
I2S controller inside the CC3220S will overflow and will not accept
nor send anymore samples. Therefore, when you want to send or receive new
samples after you paused the program you have to restart the program by using
the restart button
or by setting a breakpoint, and then continued again using the
resume button .
Because the codec on the CC3200AUDBOOST board keeps sending samples via the
I2S connection when the CC3220S processor is paused, the
I2S controller inside the CC3220S will overflow and will not accept
nor send anymore samples. Therefore, when you want to send or receive new
samples after you paused the program you have to restart the program by using
the restart button  . TI is aware of this issue, but they have not provided a solution
yet, see: https://e2e.ti.com/support/wireless_connectivity/simplelink_wifi_cc31xx_cc32xx/f/968/p/649787/2387132.
. TI is aware of this issue, but they have not provided a solution
yet, see: https://e2e.ti.com/support/wireless_connectivity/simplelink_wifi_cc31xx_cc32xx/f/968/p/649787/2387132.
Documentation
The datasheets and user guides for the CC3220S, Codec and boards can be
found at:
The CC3220S SOC and C3254 Codec are both complicated IC's and the
documentation can be quite overwhelming at first.
Lab Work Handbook
The Lab Work Handbook used in the TDS02 course can be found here:
Notes on developing an IIR filter using MATLAB's
filter design tool
Developing an IIR filter using MATLAB's filter design tool proved to be more
difficult than expected. See these notes: Notes on
developing an IIR filter using MATLAB's filter design tool.